Mediterranean Mains
1/4/2024 | 26m 55sVideo has Closed Captions
Moussaka, Grilled Halloumi Wraps and how to get the most out of your microwave.
Test cook Keith Dresser cooks host Bridget Lancaster a Greek casserole, Moussaka. Gear Heads hosts Hannah Crowley and Lisa McManus share how to get the most out of your microwave, and test cook Dan Souza makes host Julia Collin Davison Grilled Halloumi Wraps.
Problems with Closed Captions? Closed Captioning Feedback
Problems with Closed Captions? Closed Captioning Feedback
America's Test Kitchen is presented by your local public television station.
Distributed nationally by American Public Television
Mediterranean Mains
1/4/2024 | 26m 55sVideo has Closed Captions
Test cook Keith Dresser cooks host Bridget Lancaster a Greek casserole, Moussaka. Gear Heads hosts Hannah Crowley and Lisa McManus share how to get the most out of your microwave, and test cook Dan Souza makes host Julia Collin Davison Grilled Halloumi Wraps.
Problems with Closed Captions? Closed Captioning Feedback
How to Watch America's Test Kitchen
America's Test Kitchen is available to stream on pbs.org and the free PBS App, available on iPhone, Apple TV, Android TV, Android smartphones, Amazon Fire TV, Amazon Fire Tablet, Roku, Samsung Smart TV, and Vizio.
Providing Support for PBS.org
Learn Moreabout PBS online sponsorship♪♪ ♪♪ ♪♪ ♪♪ -Today on "America's Test Kitchen," Keith makes Bridget moussaka, Hannah and Lisa share how to get the most out of your microwave, and Dan makes Julia grilled halloumi wraps.
It's all coming up right here on "America's Test Kitchen."
"America's Test Kitchen" is brought to you by the following.
-Plugrà European-style butter was created for all chefs, cooks, and bakers, slow-churned with 82% butterfat for a smooth texture and more pliability for flaky crusts.
Plugrà -- from professional kitchens to your home.
-Sur La Table, where you can discover an assortment of provisions for your next meal or gathering, from cookware and tools from a wide variety of kitchen brands to hands-on cooking classes.
Visit us at surlatable.com.
♪♪ -I am very excited because today we're making moussaka -- this beautiful assembled strata of eggplant, potatoes, ground meat, béchamel.
I think this might just be the apex, the best of all casseroles.
Very excited.
And I'm even more excited because Keith is here, and he's gonna show me how to make it.
-Yeah, I'm gonna show you how to make it.
And I'm also gonna show you some ways to streamline it, because, let's be honest, with all those layers and stratas... -Right.
-...it takes some time to put it together.
So, let's start with our eggplant.
It is the iconic vegetable in this.
So I'm gonna start with 3 1/2 pounds.
I have one remaining here to cut up.
And what we're gonna do is we're gonna cut this into 3/4 inch chunks.
I like to cut the eggplant in half to make it a little bit more manageable for myself.
-Right.
-Lay the planks down.
-Okay.
-Now you need to cook the eggplant.
Right?
You need to par-cook it.
So we're actually gonna turn to the oven, and we're gonna roast this.
-Great.
-So I have it on two rimmed baking sheets.
I've sprayed the foil with nonstick cooking spray so it doesn't stick.
You're gonna help me here.
We're gonna take 1/4 cup of extra virgin olive oil.
And we're just gonna drizzle this over the eggplant.
And next up is 1/2 teaspoon of table salt.
And 1/4 teaspoon of black pepper.
-All right.
-And all we have to do is toss that.
Make sure that that oil is distributed.
That's looking great.
Now, I've preheated our oven to 450 degrees.
I have two racks in there.
So half an hour, and then I'm gonna rotate them around 180 degrees while it's roasting.
-Okay.
-While the eggplant is roasting in the oven, we're gonna focus on potatoes.
-Okay.
-So I have 1 1/2 pounds of Yukon Gold potatoes that I've sliced 1/4 inch thick here, and I'm gonna toss them with 3 tablespoons of olive oil, 1 teaspoon of table salt, and 1/4 teaspoon of black pepper.
So I'm just gonna put a plate on this, and then I'm gonna microwave these for 8 to 10 minutes.
And really we want to have these potatoes almost 100% cooked.
They're gonna be tender.
Okay.
It's been 8 minutes.
And we'll check the doneness of our potatoes.
Take the plate off here.
Now, I'll check for doneness by just taking a paring knife and making sure that the paring knife goes in and out without any resistance.
So I'm gonna transfer the potatoes to a 13 by 9 baking dish that's been brushed with 2 teaspoons of olive oil.
Like that, and now we're just gonna let these cool until they're cool enough to handle, which takes about 15 minutes or so.
-Okay.
-Half an hour is up, and let's check on our eggplant.
-Oh, beautiful!
-Smells great.
That is absolutely perfect.
So I'm gonna ask you to close that, and if you could reduce the oven temperature to 400 degrees, that would be great.
-You got it.
-While the eggplant cools, we can focus on our tomato sauce.
So I have 1 tablespoon of olive oil that I've heated over medium heat.
And we're just looking for the oil to shimmer.
Which it is.
That's perfect.
And then we're gonna add one onion.
And we're gonna add 1/2 teaspoon of salt.
And we're just gonna cook this, stirring occasionally until the onions start to brown, which will take 6 to 8 minutes.
-Okay.
-Okay, that is looking good.
We have some nice golden brown color on our onions.
I'm gonna add four cloves of minced garlic.
And I'll mix that into the onions, and we're gonna cook this for one minute until that garlic turns fragrant.
Okay, the garlic is cooked, and now I'm gonna add 1 tablespoon of tomato paste.
This tomato paste will brown a little bit, give us some body, heighten the tomato flavor.
Okay, that tomato paste is cooked.
It's taken about 2 minutes to get that dark red brick color.
Now I'm gonna add 1/2 cup of red wine.
And I'm just gonna stir that.
Make sure we get any fond off the bottom.
Now I'm gonna add our spices.
I have 2 teaspoons of paprika, 2 teaspoons of dried oregano, I have 1/2 teaspoon of pepper flake for a little bit of heat.
-Mmm!
-And then just 1/4 teaspoon of cinnamon.
We're just gonna cook this until that wine starts to reduce down, the pan will look dry.
And that will take about 2 minutes to happen.
It's been 2 minutes, and you can see that the pan is dry.
That red wine has reduced down and concentrated.
Now we're gonna add 1 pound of 80% lean ground beef.
So we're just gonna cook this, stirring occasionally, until that beef starts to lose its pink color, and that will take 4 to 5 minutes.
Okay, so the beef has lost its pink color.
-Mmm!
-And now it's time to add our 14 1/2 ounce can of crushed tomatoes here.
So we're just gonna stir the tomato in here.
We're just gonna let this simmer for 6 to 8 minutes.
And what we're looking for is we want that pan to be fairly dry.
We want a fairly dry sauce here.
We don't need a lot of moisture.
It's been eight minutes.
We can check on the progress of our sauce.
-Oh!
-Smells great.
And you can see that it's actually quite dry.
That's exactly what we're looking for.
So I'm gonna shut the heat off.
And then I'm just going to add 2 teaspoons of red wine vinegar, bring out those flavors.
Give it a little bit of acidity.
And now we can focus on the crown of the moussaka, which is a cheesy béchamel sauce.
So I have a medium saucepan here, and I have 6 tablespoons of unsalted butter that I've melted.
Now I will add 1/2 cup of all purpose flour.
Whisk that in until everything is incorporated.
It's been 1 minute and you can see that it's starting to take on a little bit of a golden color.
That's all we need here.
Now I'll add our dairy.
I have 2 1/2 cups of whole milk, and I'll just start to whisk this in, slowly at first.
Okay, we have our roux and our dairy all mixed together.
It's nice and smooth.
Now I'm gonna slowly bring this up to a boil, whisking constantly.
And it will take about 5 minutes, and over that 5 minutes it will thicken nicely.
And then after that 5 minutes, we can put our cheese in and finish this.
Been whisking this for 5 minutes.
So, you can see that it's at a nice gentle boil.
It's properly thickened.
Beautiful.
Smooth.
-That's gorgeous béchamel.
-So I'm gonna shut the heat off, and I'm gonna add 4 ounces of Kasseri cheese.
Kasseri cheese is a semi-firm sheep's milk cheese from Greece.
If you can't find Kasseri cheese, you can use Pecorino Romano and provolone.
We actually have a substitute on our website.
I'm just gonna whisk that until the cheese is incorporated and melted in there -- look at that.
God, doesn't that look good?
Okay, that's that.
Now I'm just gonna add 1/4 teaspoon of table salt and 1/8 teaspoon of ground nutmeg.
So those are incorporated in there.
Now, there's one more ingredient that we're gonna add to this béchamel to make it even more luxurious and custardy, and that's egg yolks.
But we don't want to add the egg yolks right now because it will curdle them, so what I'm gonna do is I'm gonna get all that off the whisk, and I'm just gonna put a lid on this and let that cool down for 5 minutes.
And then we can come back and put our egg yolks in there.
-Okay.
-Our béchamel has been cooling for 5 minutes and now it's time to add our egg yolks.
These egg yolks are gonna give this a nice, creamy texture.
So I have three egg yolks that I've lightly beaten before putting in here.
And I'm just gonna incorporate that.
That is looking absolutely perfect.
And now we can get to assembling.
-Yes.
-So we have our baking dish here with our potatoes.
I'm just gonna take my hands and slide these potatoes into a nice even layer.
Shingling them if I have to.
-Very good.
-Okay.
Now our eggplant.
Gonna spread the eggplant over the potatoes.
-Mmm-mmm-mmm.
-Just gonna take my hands, and I'm actually gonna use my hand to make sure that we have a nice compact layer.
Third layer is our tomato sauce.
-Yum.
-Just gonna spread this out to even layer.
-Mmm!
-Final thing -- our béchamel.
Just gonna give this a stir before I put it on there.
Make sure everything is nice and smooth.
So I'm trying to create an even layer when I put this on, because I don't wanna pull the meat sauce away from itself.
It's kind of like frosting a cake.
You want to make sure that you get the frosting well-distributed as it goes on.
I'm just kind of taking the sauce from the center and spreading it out to the edges.
I'm just gonna put this onto a rimmed baking sheet, and then we're gonna bake this in a 400-degree oven on the middle rack for a half an hour.
What we're looking for is we want that top to be nice and golden brown.
It's gonna start to bubble around the edges.
It's gonna be fantastic.
It's been a half an hour.
Check on our casserole.
Thank you.
Oh, wow!
-Ohhh!
-Perfectly brown and bubbling around the edges.
Excellent.
-I can see that.
Oh, my goodness.
-Okay, this is looking absolutely beautiful.
-Stunner.
-But we're gonna have to let this sit for at least a half an hour.
We want those kind of layers to be cohesive.
So 30 minutes, and then we can eat.
-Okay.
-It's time to cut into our moussaka.
So I'm just gonna cut it into quarters this way.
And then cut this way.
-Mmm.
-Time for the big reveal here.
-Oh-ho-ho-ho-ho!
-Ho-ho!
Look at that.
-[ Gasps ] -Beautiful.
-Oh, my goodness.
So many beautiful layers and they all stayed nice and separate, but they're compressed together.
I've got to stop talking and start eating.
-[ Chuckles ] -All right I got a little bit of eggplant there, definitely some of the sauce and that cheesy béchamel top.
That is pure luxury.
-It is.
-That is absolutely beautiful.
-The eggplant is so silky, along with the béchamel on the top.
-I'm gonna get some of the potato because I know the potato's in there.
Their job is to soak up everything else that was in the pan.
Mmm.
-Mmm.
-Mmm!
This is absolutely the best moussaka I have ever had.
Well, if you want to try making this winner of all casseroles at home, roast eggplant to drive off moisture, precook the potatoes in the microwave, and simmer the tomato meat sauce to ensure a very sliceable casserole.
Of course, don't forget to layer everything under a blanket of that Kasseri béchamel.
From "America's Test Kitchen," the ultimate moussaka.
This is a winner.
100%.
♪♪ -If you're just reheating leftovers and zapping cold coffee in your microwave, you are not getting the most out of it.
A microwave oven is a real cooking tool.
-More and more, we've been using them to do jobs that they can do easier and faster, things like frying shallots or melting chocolate or par-cooking vegetables or even whipping up a quick side dish by steaming it in the microwave, like broccoli or carrots.
-Today we're gonna talk about how microwaves work, what to look for in a good one, and how to get the most out of yours.
-It's important first to understand a little bit about how microwaves work.
This is 1940s technology.
They're powered by a vacuum tube called a magnetron.
Now, these electromagnetic waves can pass right through containers and only penetrate the food, where they vibrate the water and the fat molecules to create heat.
But these waves only penetrate less than an inch, so the food is hotter on the outside and colder on the inside.
Also, those waves move in a set pattern.
So depending on where the food is, it's gonna get more or less power.
That's why the turntable turns, but that only helps a little.
-Microwaves are a blunt instrument -- they are not precise.
And while high wattage might sound like a good thing -- a lot of manufacturers brag about their high wattage -- all it will get you is shriveled, overcooked food and exploding butter.
On the other end of things, the lower wattage models, we ended up having to add time again and again.
It was just inefficient.
The ideal was 900 to 1000W.
This was the sweet spot.
Most frozen food, in fact, is designed right for this range.
You can see this mac and cheese, totally overcooked.
While this one is creamy and delicious.
-You want to keep it simple when you choose a microwave.
Some of the microwaves we tested had fancy features that we just did not find worthwhile, things like inverter technology that kept the power consistent rather than cycling, or Scan-to-Cook technology that lets you scan product barcodes that send the cooking instructions right to the microwave.
Or voice control, or like this one with all its crazy buttons, just really specific things like kids meals.
What does that even mean?
Now you really want a microwave that anyone can walk up and operate.
You do not want to have to get out the user manual.
-All right, so we've talked about how microwaves work, what to look for in a good one.
Now let's get to how to get the most out of your microwave because as we mentioned, these are imprecise tools.
First of all, you're gonna want to put your food off center.
This allows it to pass through those higher and lower radiation zones, so it will cook more evenly.
Second of all, you want to flip or rotate your food.
Again, this will help even out those hot and cold spots.
And finally, you want to let your food stand after cooking, anywhere from 2 to 15 minutes, depending on the size and quantity.
And again, that will just help those hotter and cooler spots even out.
-Another great trick we learned -- use lower power percentage settings.
Now, before I did this testing, I always microwaved everything on full power.
When you set your microwave for lower power, like 50% or 70%, you're giving that food a little more time to cook more gently without scorching.
This is also a great way to rein in the power of those high wattage microwaves.
So with some of these tips, we hope you get more out of your microwave.
-For full testing results and all the details, head to our website.
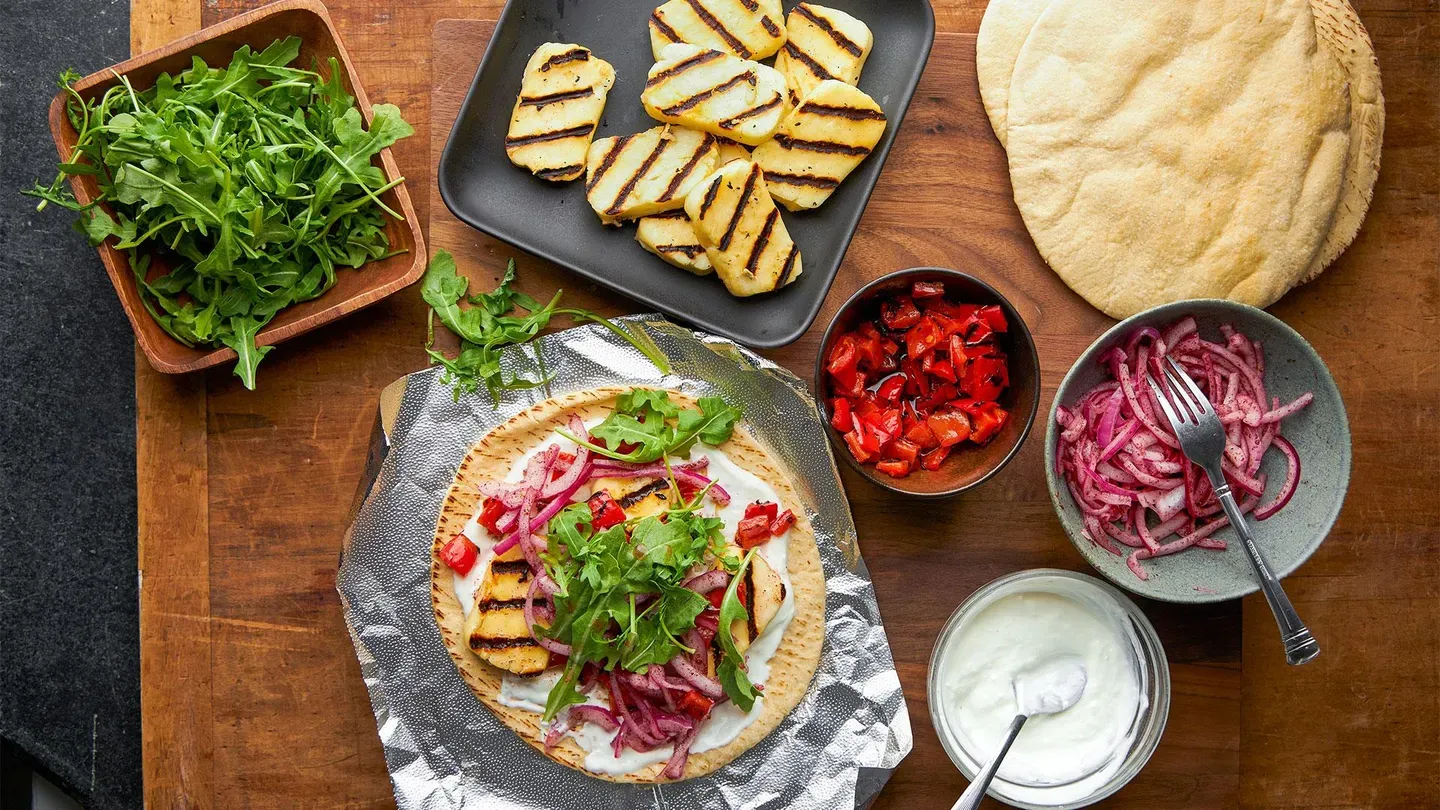
♪♪ -Halloumi is a traditional cheese from the Mediterranean island of Cyprus.
And the cool thing about it is it doesn't melt, so you can grill it or sear it.
And today, Dan's gonna show us how to throw it on the grill with a couple vegetables.
-That's right, we're gonna give new definition to the term "grilled cheese" today.
-[ Laughs ] I like it.
-So halloumi's amazing.
It's salty and funky.
We're gonna really make it the star of this dish.
We're gonna wrap it in a warm pita with lots of delicious things.
One of those delicious things is some sumac onions.
-Oh, wow.
-Yeah.
-So they're gonna be tart and crunchy, kind of pickled -- really nice.
So we're gonna start with the red onion here.
And I'm just gonna trim off both ends.
You can tilt your knife and go along the radial curve.
-The horizon.
-Yeah.
All right, great.
So now we have our onions here, we're gonna season them up.
So I have 3 tablespoons of red wine vinegar.
And now I have our magic ingredient -- I have 1 tablespoon of ground sumac.
-Mmm!
-And 1/4 teaspoon of salt.
So we're just gonna toss this together.
It's about the easiest little pickle we can do.
Awesome.
So I've got a nice bell pepper here.
We're gonna grill this along with the halloumi.
So, for this, I'm gonna knock off about the bottom half inch and top half inch.
And these are beautiful, we're just gonna... -Mmm.
-...save them as is.
And then for the pepper itself, we're gonna do one slice down and then start opening it up.
I bring this to me, and as you go, really just letting your knife go along the texture of the pepper there.
So we'll place these over here on our takeout tray.
All right.
Let's take a look at our beautiful halloumi.
So you'll see it usually packaged, you know, in kind of big pieces like this.
-Mm-hmm.
-And it's really firm.
We're simply gonna cut 1/2 inch slices here.
Okay, so we've got our 12 ounces of halloumi sliced into nice 1/2 inch planks.
All right, so we'll transfer this to our takeout tray.
A good wrap is all about having contrasting textures and flavors and a lot of interesting stuff happening.
So we've got great vegetables.
We're gonna have those onions and the cheese, but I want to make a creamy sauce that's gonna pull everything together.
So we're gonna start with 2 tablespoons of lemon juice, and I have a garlic clove.
I'm just gonna use my fine grater here to get that incorporated.
Okay, next I have 1/2 cup of Greek yogurt.
And then finally 1/4 teaspoon of salt.
All right, and then I'm gonna use an absolutely tiny whisk.
And then finally, we've got our pitas.
So I've got four 8-inch pitas here.
-Nice.
-We're gonna warm them on the grill.
-Mm-hmm.
-So what we're gonna do is spray the top one here and the bottom one I spray with a little bit of water.
The ones in the middle are nicely protected, so they're just gonna steam.
I'm gonna place them in some heavy duty aluminum foil.
And I just gave this a quick spray with cooking spray so that nothing sticks.
-Mm.
-All right, we have all of our components to do the grilling, so I'm gonna head outside.
-All right.
As I mentioned earlier, halloumi is unique as a cheese because it doesn't melt.
Here's why -- Cheese is essentially made up of fat and water held together by a web of casein protein.
The protein strands are connected with calcium, so when cheese gets hot, that protein web relaxes and stretches, allowing the cheese to soften, melt, and flow.
Now, typically, the cheese making process is quite acidic, which causes a lot of that calcium to dissolve away.
Halloumi is unusual because it's made in a less acidic environment than most cheeses, and as a result it contains more calcium.
When halloumi gets hot, the protein web stretches and relaxes, but only slightly, because the calcium keeps the protein network more tightly knit.
So it softens, but it won't flow.
And that's why halloumi is a cheese that you can and should throw on the grill.
-Okay, it is time to grill some cheese.
I had my grill here preheating for about 15 minutes on high.
-Ooh, it's hot!
-It is nice and hot.
So what I'm gonna do is turn off all but one burner.
-Okay.
-This is gonna be my primary burner, and now I have a nice, cool side to work with as well.
-Dig it.
-Next step is to clean it up, so use a nice grill brush.
And then we're gonna use some paper towels and a little bit of oil just to season it up a bit.
-Mm-hmm.
-It's gonna help with sticking.
All right, so we're gonna start with our cheese here.
And you're seeing that I'm not adding any oil to it.
Obviously we just oiled the grill... -Yeah.
-...which is great.
But the cheese is gonna render plenty of fat.
There's no issues with sticking on it.
So we have our lovely red bell pepper here.
We're gonna go down skin side up.
So the flesh takes on nice flavor.
-Nice.
-Awesome.
And then finally we have our pitas.
Remember we moistened the outside ones, so there's some moisture in there to cause steam.
That's gonna warm them up nicely.
And then they're just gonna go on the cool side over here.
-Great.
-I'll flip them every now and then, but for about 5 minutes and they'll be nice and warm.
I'm gonna close the lid here.
-Ah, that's my next question -- open or closed?
-Closed is really good for gas grills.
It helps maintain the heat in there a lot.
So we're gonna go 3 to 5 minutes on this side.
And we'll take a look, and then we'll flip them over.
-Sounds good.
-All right.
-Mmm!
-You can smell that cheese, right?
-Yes, it smells delicious.
-All right, so I'm gonna flip it.
Oh, that is beautiful.
-Goodness!
-Okay, I'm gonna give those just a couple more minutes.
While I'm in here, I'm gonna flip over our nice pitas.
-Okay.
-And take a look at the pepper.
They're starting to pick up some nice color on that first side.
-Oh, I can smell those, too.
-All right.
So I'm gonna grab our pitas off now.
-All right.
-They're nice and warmed up.
And it's gonna be another 3 to 5 minutes for our cheese and pepper to be beautiful.
-Great.
-Let's take a look.
-Ohh!
-All right, so we're gonna get our peppers off.
They've turned nice and soft with some beautiful spots of char.
And I love it with the sweetness, grilled and red peppers -- it just goes perfectly together.
All right, and let's grab our beautiful cheese here.
-Oh, look at those pillows!
-Beautiful.
-Gorgeous.
Well done.
-Thank you.
I don't know about you, but I'm ready to go inside... -Yes.
-...and turn these into wraps.
-Yes, please.
-Let's do it.
Look at that grilled halloumi.
-Mmm.
-And our bell pepper.
I'm gonna start with this.
I'm gonna cut it into 1/2 inch pieces, so they fit really nicely in our wrap.
Transfer this over to a bowl, and we're gonna season it up with 1 tablespoon of extra virgin olive oil.
1/4 teaspoon of red pepper flakes.
Tiny bit of heat there.
-Mmm, little kick.
-And 1/4 teaspoon of salt.
Okay, it is time to assemble.
So we're gonna take out a couple of our warmed pitas.
-Ohh, they smell perfect.
-And they're nice and pliable, too.
-Yeah.
Oh, that smells good.
-That's a really important part of it.
So we're gonna do a little bit of our beautiful garlicky yogurt.
And so I'm gonna take this out almost -- almost all the way to the edge.
Beautiful.
Now for our halloumi, we'll do a couple nice pieces.
All right, so the next step, we're gonna put some of our beautiful pepper mixture on top.
Oh, man, look at these.
-Oh, look how they wilted.
The salt really drew out some of that onion moisture.
-And then just a little bit of arugula.
This adds some nice pepperiness.
All right, so I'm gonna get a little of that onion juice.
-Oh, wow.
-You can see that it's just packed with that sumac, too.
-That is a pretty sandwich.
-Isn't that nice looking?
Okay, so now it's time to wrap.
So I'm gonna bring this side up.
And then pull back a little bit and then just keep rolling over.
And then what I'm gonna do is roll the sides in first.
So over and then make a nice, tight little package.
Gorgeous.
-Dan, these look amazing.
-Just a little squeeze and you see how juicy it all is.
-[ Chuckles ] -That's always a good sign.
-Mmm!
That is delicious.
-It's so good.
-Mmm!
You taste the creaminess and that slight goat flavor of the halloumi.
But then you have the sumac and you have the arugula and you have the little garlic from the yogurt, and the whole thing together tastes great.
-You know, we talk about halloumi being meaty tasting... -Mm-hmm.
-...and it really is, like, if you have to have protein in a sandwich, this will absolutely satisfy.
It's got such a good meatiness to it.
-Dan, this is terrific.
Thank you.
-You're welcome.
-If you want to make this killer grilled halloumi sandwich, start by marinating red onions with vinegar and some ground sumac, and grill the peppers and halloumi over a hot fire until nicely browned.
From "America's Test Kitchen," a spectacular recipe for grilled halloumi wraps.
You can find this recipe and all the recipes from this season, along with our product reviews and select episodes at our website, americastestkitchen.com/tv.
This might go into regular rotation at my house.
-Mm.
-It's so easy.
-Visit our website where you can sign up for our free email newsletter for even more of the recipes and stories you love from all of our cast and cooks.
Americastestkitchen.com/tv.
-From the cooks and editors of "America's Test Kitchen," Cook's Illustrated Magazine has been all about the why and how of cooking for over 30 years.
Get a year of award-winning reporting, science-based discoveries, trusted reviews, and more.
The cost is $19.95.
That's 63% less than the cover price.
To subscribe, scan the QR code on your screen or visit cooksillustrated.com /tvsubscribe.
"America's Test Kitchen" is brought to you by the following.
Plugrà European-style butter was created for all chefs, cooks, and bakers, slow-churned with 82% butterfat for a smooth texture and more pliability for flaky crusts.
Plugrà -- from professional kitchens to your home.
-Sur La Table, where you can discover an assortment of provisions for your next meal or gathering, from cookware and tools from a wide variety of kitchen brands to hands-on cooking classes.
Visit us at surlatable.com.
♪♪ ♪♪ ♪♪ ♪♪ ♪♪ ♪♪ ♪♪ ♪♪ ♪♪ ♪♪


Support for PBS provided by:
America's Test Kitchen is presented by your local public television station.
Distributed nationally by American Public Television